From MICHAELS
A Winter Snowman Page Marker will help keep your place for your favorite holiday reading.
YOU’LL NEED
Project Template (CLICK HERE)
Kids Blunt Tip Scissors
Creatology 9”x12” Construction Paper, White
Crayola Super Tips Washable Markers
Creatology 1/2” Pom Poms, Red
DIRECTIONS
1.CLICK HERE to download the template and folding diagram. Cut out the shapes on the template. Set aside.
2.Cut a piece of white construction paper to 9″ x 9″.
TIP: Follow the folding and cutting directions on the diagram.
3.Fold the 9″ x 9″ piece of construction paper in half, diagonally, so you have a large triangle. Orient the triangle so the point is at the top.
4.Fold the right corner from the bottom of the triangle up to the point at the top and make a crease. Fold this flap in half, vertically, and make another crease. Open the fold back up to the large triangle. Repeat for the left corner.
5.Reverse the crease of the vertical fold on each side. To do this, simply fold the flap the opposite direction. Open the fold.
6.Fold the point at the top of the triangle on the top layer down to the center point across the bottom, to form a smaller front triangle.
7.Take the bottom right portion of the triangle, fold it back up over the fold in Step 6 and tuck in the excess behind the smaller front triangle. Repeat for the left corner.
8.Orient the (now square) shape so the bottom layer of the original top point of the large triangle is pointing down and the opening of the “pocket” made in Step 7 appears upside-down. This is the base of your page marker.
9.Lay the circle template cut in Step 1 about 1/4“ below the top point of the upside-down pocket. Allow the top rounds of the circle to hang over the sides of the pocket a little. Trace circle onto the base of the page marker.
10.Cut out the circle. Be sure to leave the sides of the pocket uncut where the circle hung off the sides in Step 9.
11.Trace and cut out the hat (large triangle) or headband (arch) for the ear muffs from red construction paper. Glue onto the snowman’s head.
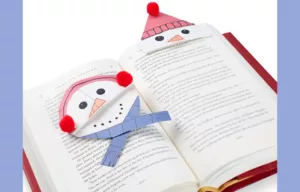
12.Trace the two long, thin rectangles on blue construction paper, or color of choice, and cut out the shapes. Glue at the bottom of the snowman’s head to represent a scarf. Use image as a guide.
13.Draw details on the hat with markers, or glue pom poms on each side of the headband to complete the ear muffs.
14.Draw the face onto the snowman.
15.Trace the carrot nose (small triangle) onto orange construction paper, cut out and glue into place.
Find this craft and more holiday fun at michaels.com