From MICHAELS
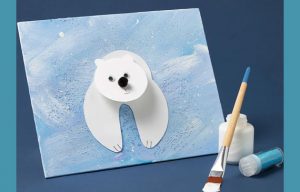
This pretty wintery scene is so fun to make. Paint your background and add some salt and glitter for some texture and sparkle. Then add a cute polar bear to finish the scene!
YOU’LL NEED
1 1/2″ Pom Poms By Creatology – Color: Black
1 Extra Fine Glitter Stacker – Color: Crystal
1 Elmer’s Washable School Glue
1 Assorted Adhesive Wiggle Eyes By Creatology
1 Multi-Surface Premium Satin Acrylic Paint By Craft Smart, 2oz. – Color: White
1 Multi-Surface Premium Satin Acrylic Paint By Craft Smart, 2oz. – Color: Crisp Blue
1 Multi-Surface Premium Satin Acrylic Paint By Craft Smart, 2oz. – Color: Blue Sky
1 Multi-Surface Premium Satin Acrylic Paint By Craft Smart, 2oz. – Rich Lilac
1 20 Color Round Tip Washable Marker Set By Creatology
1 5 Pack 9″ X 12″ Canvas Panel By Creatology
1 Blunt Tip Scissors By Creatology
1 Triangle Paint Brushes By Creatology
Salt
Computer
Printer
Pencil
DIRECTIONS
1. Start by painting your wintery background on your canvas board.
2. Paint white, purple and blue horizontally across the canvas to emulate wind and blowing snow. While the paint is still wet, add some salt and move it around with your paintbrush. You will start to get some texture as it mixes with the paint. Before the paint is dry, sprinkle some glitter over the canvas to add some sparkle to your snow. Now, set the canvas aside to dry.
3. Click here to download and print the template; then cut out the pieces.
TIP: Use image as a guide. Draw your shape onto your wax (or palette) paper then shape the clay over the drawing.
4. Trace the shapes onto white cardstock and cut out the pieces.
5. Glue the polar bear’s body onto the canvas.
6. Cut a strip of cardstock that is about 1″ x 2″ [2.5 cm x 5 cm] long, and fold it in a pleat to make a paper “spring” for the bear’s head. Glue one end of the “spring” to the back of the bear’s head and the other end in place on the canvas on the top of the bear’s body.
7. Glue on two wiggle eyes and a pom-pom for the nose, then add details for the mouth and feet using a black marker.
Share your project photos with #MakeItWithMichaels
Find this craft and more holiday fun at Michaels.com