From MICHAELS
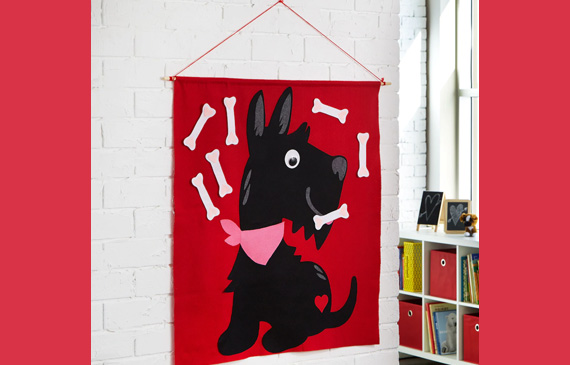
This fun SHARE A TREAT WITH THE PUPPY is the perfect game for Valentine’s Day, a birthday party, or just a fabulous playdate with friends. Spin one…two…three…and feed the dog a bone!
YOU’LL NEED
Puppy Template (CLICK HERE)
2.4” Wiggle Eyes by CREATOLOGY
VALUE Solid Yarn by CRAFT SMART, Bright Red
ELMER’S GLUE ALL Multi-Purpose Liquid Glue, Extra Strong
VELCRO Brand Sticky Back for Fabrics Tape, 24”
36” X 36” Basic Felt by CREATOLOGY, Red
36” X 36” Basic Felt by CREATOLOGY, Black
9” X 12” Basic Felt by CREATOLOGY, Red
9” X 12” Basic Felt by CREATOLOGY, Smoke
9” X 12” Basic Felt by CREATOLOGY, Candy Pink
9” X 12” Basic Felt by CREATOLOGY, Baby Pink
9” X 12” Basic Felt by CREATOLOGY, White
HEAT N BOND Iron-On Adhesive, Lite
36” Wooden Dowel by ARTMINDS, Natural, 3/8”
CRAYOLA Pointed Tip Scissors
LOOPS & THREADS Pinking Shears
Computer
Printer
Ruler
Pen
Iron (Adult Use)
Dishtowel or Light Cloth
DIRECTIONS
1.Project Note: Pinking shears and VELCRO STICKY BACK tape are optional and are to be used by an adult only. Likewise, only an adult should use the iron to press HEAT N BOND onto the felt.
CLICK HERE to download the templates. Re-size them until they’re as large or as small as you like, print and cut out. Set the template pieces aside.
2.ADULT: Follow the package directions to heat your iron and press HEATNBOND onto the back of the 36″ x 36″ black felt sheet, as well as onto all the 9″ x 12″ felt sheets, except for the Sandstone piece. TIP: To keep the iron from melting the felt, use a lightweight piece of fabric to cover the felt as you press. This could be a cotton dishcloth or a spare piece of muslin. Just make sure the iron does not touch the felt directly.
3.Once the felt and HEATNBOND are attached, trace the template pieces onto the paper backing of the HEATNBOND. Make sure you trace each piece wrong side up, so that they are all facing the right way. Trace as follows:
4.Now, you will cut out all the template pieces, cutting through both the felt and the HEATNBOND and its paper backing.
5.One at a time, peel away the paper backing on each smaller template piece, and place it (felt side up) onto the puppy body, using the image as a guide. Follow the instructions to press the smaller felt pieces in place. Do not forget to use a cloth to protect the felt as you work. Set the puppy aside.
6.Unfold the 36″ x 36″ red felt sheet, pressing with an iron to remove any creases.
7.To make a sleeve for the dowel, measure and cut a 36″ x 1/4“ piece of HEATNBOND. Press it onto the very top edge of one side of the felt. This will be the top edge of the banner.
8.Mark a parallel line 2 1/2“ below the top edge. Remove the HEATNBOND paper backing, fold over the edge to the line you have marked, and press with the cloth on top until the HEATNBOND is completely adhered, and your sleeve is complete.
9.Use a ruler and a pen to mark a 2″ border on each side of the banner and trim away this excess using scissor, or pinking shears if you prefer a decorative edge.
10.Remove the paper backing from the HEATNBOND from the puppy’s body, center it onto the red banner, and use the iron and cloth to press it in place. Be careful to make sure that all edges are completely adhered.
11.Once the puppy is in place, glue on his wiggle eye, using this image as a guide. Let it dry completely.
12.To hang the banner, slide the dowel into the sleeve at the top. Cut a 6′ piece of red yarn and tie it to each end of the dowel.
13.Finally, remove the paper backing from the smaller pink hearts and press them onto the ends of each dog bone.
14.OPTIONAL: To make your bones stick to the felt banner more easily, cut 1” pieces of the hook (rough) side of VELCRO Brand tape. Remove the backing from each one, and press two pieces onto the back side of each bone, near the ends. Only an adult should cut and apply the VELCRO tape.
15.To play, hand a bone to a blindfolded player, spin him or her three times, and let them try to “feed” the bone to the puppy by placing it as close to his mouth as possible.
Find this craft and more holiday fun at michaels.com