From MICHAELS
Your little ones will have tons of fun mixing up this Turkey Slime over Thanksgiving break. Then, decorate a jar to make the craft super festive.
NOTES
*ADULT SUPERVISION REQUIRED. When you’re crafting with little ones, keep your own eyes on the wiggle eyes, since these may present a choking hazard.
-When making slime, protect your work surface with wax (or parchment) paper. You also may want to wear an apron (or other protective garment) to avoid slime-related accidents.
YOU’LL NEED
Favorite slime recipe
Wilton Icing Colors: Brown and Copper
Creatology Jumbo Wood Craft Sticks
Elmer’s Washable School Glue
DecoArt Plastic Storage Jar
Pencil
6”x 9” Adhesive Foam Sheets by Creatology: orange, yellow and red
Creatology Blunt Tip Scissors *ADULT SUPERVISION REQUIRED
Ruler
Wiggle Eyes
DIRECTIONS
1.Start by finding your favorite white glue slime recipe to use for this batch of turkey slime.
TIP: You can find tons of slime recipes at elmers.com
2.Follow your recipe’s instructions to make a batch of white slime. Mix in Brown and Copper icing colors. Continue adding and mixing in the color until your turkey slime is a lovely orangey-brown color.
TIP: Dip a craft stick into the icing color container, then mix the color into the glue, stirring thoroughly until it’s completely blended. Always use a new, clean craft stick when dipping into your food coloring in order to avoid cross-contamination.
3.There are no mix-ins for turkey slime! Once you have the color just the way you like it, set the slime aside while you decorate your jar to look like a turkey.
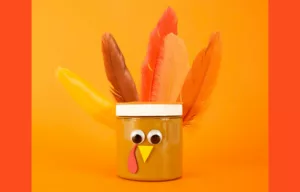
4.Turn over your jar and trace the lid onto the paper backing on the back of a piece of orange adhesive foam. Cut out this foam circle and set aside.
5.Now, cut a small triangle from a sheet of yellow adhesive foam for the turkey’s beak, a red teardrop shape for his snood and then two 1 1/2“ x 3″ rectangles of orange adhesive foam.
6.Add the turkey slime to your jar.
7.To add the feathers:
– Remove the paper backing from one foam rectangle and press it against the back side of the jar.
– Remove the paper backing from the second foam rectangle and lay it, sticky-side up, on your working surface. Pick out and press five feathers onto the sticky-side of the foam.
– Carefully lift the rectangle foam with the feathers and match it up with the first rectangle on your jar, so that you can see the feathers over the top of the jar.
8.Remove the paper backing from the orange circle and stick it onto the lid of your jar, covering it completely.
9.Stick two wiggle eyes to the front of your jar.
10.Remove the paper backing from the yellow triangle and place it just below the eyes.
11.Remove the paper backing from the red snood shape and place it on the jar so its narrow end is between one eye and the beak. Gobble, gobble!
Find this craft and more holiday fun at michaels.com