
From JOANN
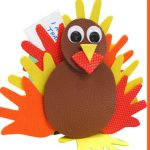
Stay organized with this cute turkey keepsake holder
YOU’LL NEED
text-UR&foam variety pack – Multi
Upright tissue box-empty
2 wiggly eyes 25mm
Ruler
Scissors
Glue gun glue sticks
3D space-urs&
DIRECTIONS
1. Cut out one 6&diameter circle from the brown text-UR Foam sheet for the turkey body.
2. Cut out a 3-1/4&diameter circle from another brown text-UR foam sheet for the turkey head.
3. Cut a 1” triangle from the yellow text-UR Foam sheet for the beak.
4. Cut a triangle measuring 2-1/2&x1-1/2&high from the red text-UR foam for the wattle under the beak.
5. Using your hand as a template for the feathers and feet, trace 8 hands on the yellow, orange and red text-UR Foam sheets. Each text-UR foam sheet should accommodate two hands.
6. Wrap the sides and back of the tissue box with green text-UR Foam sheets.
7. Using the 3D space-urs&, attach 7 of the feathers to the back of the turkey body.
8. Using four 3D space-ur&, attach the turkey head to the front of the turkey body.
9. Use 3D space-urs& to add the wattle and the beak
10. Glue the eyes onto the front of the turkey head.
11. Glue the remaining hand shape to the bottom of the tissue box for the feet and glue completed turkey to the front of the tissue box.
12. Have everyone fill out a card with what they are thankful for and keep until next Thanksgiving, then pull out the cards and read what everyone wrote.
Find this craft and more fun at joann.com