
From MICHAELS
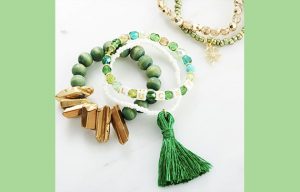
Celebrate St. Patrick’s Day in style with these fabulous Lucky Stacked Stretch Bracelets.
YOU’LL NEED
Stretch MAGIC Bead & Jewelry Cord
Jump Rings
Gift Card
Beadalon G-S Hypo Cement
BEAD GALLERY Gold Czech Fire Polished Glass Faceted Round Beads, 6mm
BEAD GALLERY Gold Luster Quartz Nugget Beads
BEAD GALLERY GreenMix Faceted Czech Glass Round Bead, 6mm
BEAD GALLERY Crystal Glass Mix Beads
BEAD GALLERY Green Glass Seed Beads, 6/0
Disposable Cup
RIT All Purpose Liquid Dye, Kelly Green
BEAD LANDING Light Natural Wooden Round Beads, 10mm
BEAD GALLERY Gold Metal Roundelle Beads. 4mm
BEAD LANDING Craft Mixed Alphabet Beads
AMERICANA Acrylic Spray Sealer/Finisher, Gloss
BEAD LANDING Bead Organizer & Tool Set
LOOPS & THREADS Straight Scissors
DIRECTIONS
1.First, make a green tassel from a skein of satin floss. To do this:
STEP 1: Carefully pull out 12″ of floss. Cut and then set this length aside.
STEP 2: Wrap floss (still attached to skein) around an old gift card (the short side) about 20 times. Open a jump ring and thread it, so all of the strands from one side of the old gift card are inside the jump ring; then, close the jump ring.
TIP: To open and close a jump ring, simply grasp the jump ring on both sides with chain nose pliers and twist the ring open, from side to side. Never pull the jump ring, which can cause distortion.
STEP 3: Slide the jump ring up to the top and slide the floss off the gift card, careful not to disrupt the loops. The jump ring is the top of your tassel.
STEP 4: Wrap the 12″ piece of floss around the outside of the loops, about 1/4“ below the jump ring. Wrap it several times and then tie a double knot to secure the hold.
TIP: Use a small crochet hook to pull the ends of the wrapped floss through the back of the wraps so they hang a little better within the tassel.
STEP 5: Cut open all of the loops at the bottom of your tassel, and then cut the ends even across the bottom.
2.Measure and cut a 10” piece of stretch cord for each bracelet.
3.To dye your wood beads green:
STEP 1: Soak your beads for a few minutes in a small disposable cup with a little hot (to touch) water.
STEP 2: Add enough dye to the beads/hot water so they are completely covered.
STEP 3: Let them soak for a few hours; then place the beads on a stack of paper towels to dry completely.
STEP 4: Spray them with a sealer and let dry.
TIP: String your wood beads on long piece of floral wire to weight them down. Bend the wire at each end so you can easily lift the beads out of the dye bath.
4.For the green seed bead bracelet, slide about 1″ of seeds beads onto a stretch cord, then add two spacer beads. Repeat this until you reach 6 1/2“, or the length needed for your bracelet.
TIP: Use a piece of tape (or a mini BEAD BUG) at one end of the stretch cord when adding beads, to keep them from sliding off as you work.
5.Tie the stretch cord into a tight surgeon’s knot and then tuck its ends back through the closest beads.
6.Add a dab of bead stringing glue over the knot. Now, pull the ends tight, so the two closest beads press together tightly, hiding the knot. Trim the ends of the stretch cord; then set your bracelet aside to give the glue time to dry.
7.Add beads to each stretch cord, as desired. Repeat Steps 5 and 6 to complete each bracelet.
8.Add your tassel and a clover charm to any of your bracelets. To do this, simply open the jump ring, slide it between two beads and then close the jump ring.
Find this craft, brands listed, and more holiday fun at michaels.com