From JOANN
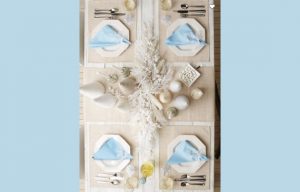
Make your table a winter wonderland!
YOU’LL NEED
Pair of old skis
Stencil brush
Small bottle of acrylic pearlescent paint
Skein of white knobby yarn
Chain for hanging
Eye screw with washer
2 Yards white 1/4″ foam
2 Yards of Peltex
Can of white chalky spray paint
Can of cream stone texture paint
Large snowflake stencil – enlarged on cardstock at copy store
Heidi Swank angular paper clips
Roll of monofilament thread
3 different small snowflake stencils
Metal straight edge-ruler
X-Acto knife
Wire cutters
Cutting surface
Spool of 24 gauge wire
Scissors
DIRECTIONS
SKIS
1.Clean the skis and remove all hardware. Sand the edges and any rough area to make them nice and clean.
2.Spray paint the skis chalky white paint and allow them to dry.
Spray the tips of the skis with the texture paint to simulate the look of snow and allow them to dry.
3.Using the small snowflake stencil paint snowflakes randomly onto the skis and allow them to dry.
4.Decide where the middle of the skis is and drill a hole through both skis at the same time. Screw in the eyebolt and attach the chain. Optional: spray paint these white if desired.
5.Wrap the chain and the base where the skis are connected with the white knobby yarn to cover the chain and the center of the chandelier.
SNOWFLAKES
1.To print the stencil, click on the “Download Project PDF” button (above).
Enlarge the snowflake stencil onto cardstock to 14″ at any local copy store.
Cut out the snowflake using the X-Acto knife. This is the pattern to make the large snowflakes.
2.With a pen trace the snowflake onto the foam and Peltex.
Cut out the snowflakes with scissors or X-Acto knife. Cut a hole in one of the tips for hanging.
3.Attach the Heidi Swank paper clips for hanging the snowflake.
4.On the skis attach the monofilament thread for hanging the snowflakes. Make a loop at the end of each hanging thread to easily slip the snowflakes on and off the skis.
WIRE SNOWFLAKES
Using the 24-gauge wire design a snowflake starting from the center. Make 6 sides of each snowflake. Twist and tie off the wire in the center of the snowflake. Spray paint the finished wire snowflake white.
Painted Glasses with Snowflakes
Stemless wine glasses
White gloss enamel glass paint
Fine point screw-on top
Rubbing alcohol
Cotton balls or soft cloth
Painter’s tape
DIRECTIONS
1.To print the pattern, click on the “Download Project PDF” button (above). Enlarge patterns.
2.Use cotton ball or soft cloth to wipe glass off with rubbing alcohol.
Tape snowflake pattern to inside of glass.
3.Remove cap from paint and screw on fine point top.
Gently squeeze paint out onto glass following lines of pattern.
Allow to dry thoroughly.
Follow manufacturer’s directions to bake or air dry before using.
Hint – Practice on an old glass first.
Pop-up Name cards
Circuit machine
Snowflake design 5″ wide
Metal straight-edge ruler
X-Acto knife
Tacky glue
Set of stick-on adhesive silver letters
Cutting surface
Sheet of pearl finish white cardstock
Sheet of white metallic vellum white cardstock
Sheet of white shimmer silver snow cardstock
DIRECTIONS
EACH PLACE CARD
1.Create 2 snowflakes on the pearl finish cardstock on the Circuit machine.
Fold each snowflake in half and glue them together to make one snowflake.
2.Using the scrap of pearl paper, cut out the outline snowflake and glue it down on the shimmer silver snow cardstock centering the opening onto a silver snowflake.
3.Allow it to dry and then trim out the two papers with the X-Acto knife to make a base snowflake.
4.Glue the 3-D snowflake onto the base snowflake.
5.Cut out a 3/4″ strip of the white vellum paper.
6.Apply the letters to the strip of vellum. Cut the edges of each name card at a 45-degree angle to make it feel like a ribbon edge. Do this on both sides of the name card.
7.Place or glue the name card nestled into the snowflake.
Snowflake Napkins
1 yard light blue cotton fabric
Snowflake stencil
Stencil brush
Small bottle of white fabric paint
Metal straight edge-ruler
Sewing machine
Basic sewing supplies
Iron & pressing surface
Rotary cutter, ruler & mat
DIRECTIONS
1.Cut four 19″ squares out of the cotton fabric.
2.Press 1/4″ hem around the square of each napkin. Fold the hem over again and press.
3.Make a single top stitch on the hem.
4.Using the stencil, fabric paint and stencil brush, make a stenciled snowflake design on the napkin. Vary the snowflake location on the napkins. Allow to dry.
Yarn Wrapped Cone Christmas Trees
Yarn – variety of shades of white, gray; variation of styles: thicknesses, types
Paper mache cones and/or Styrofoam cones, variety of sizes
White poster board
Glue
White acrylic paint
Small sponge brush
Paper cutting scissors
Small straight pins
Pencil
DIRECTIONS
Paint the paper mache cones white.
Wrap the styrofoam cones with poster board to create a point at the top. Use small straight pins to secure the poster board onto the Styrofoam and glue to secure edge. Cut the excess poster board off evenly around bottom of the cone.
Wrap selected yarn around the cone Christmas tree, starting at the top. Use glue on the tree sparingly to help secure the yarn. Trim excess yarn.
Continue with remaining “trees”, using a different yarn styles for each tree.
Find this recipe and more holiday treats at joann.com