From JOANN
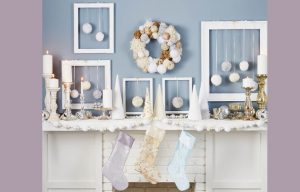
Let it snow…on your mantle
YOU’LL NEED
Sheer Glitter Christmas Stocking
1/2 yard organza with glitter or embroidered design
1/2 yard solid organza for lining
Fray Check
Sewing machine
Iron & pressing surface
Basic sewing supplies
DIRECTIONS
1. To print the pattern, click on the “Download Project PDF” button (above). Enlarge pattern as indicated.
2. Cut 2 stocking pieces each of glitter fabric and lining for front and back.
3. With RST, pin glitter fabric together; pin shear lining fabric over glitter fabric.
4. Sew front to back using a 1/2″ seam.
5. Trim seam close to stitching; seal seam edges with Fray Check; allow to dry.
6. Carefully clip curves; do NOT turn RS out.
7. Cut a piece of lining 2″ x 5″ for hanger.
8. Press hanger piece in half, open and press edges to center; press into 1/2″ x 5″ and edge stitch.
9. Fold in half to make hanger and baste over WS of back seam of stocking.
10. Cut 2 pieces of lining 8″ x 13″ for cuff.
11. With both pieces together, sew 8″ sides together to form the back seam.
12. Trim and Fray Check seam as above.
13. Fold the cuff, matching up the raw edges forming a cuff about 12″ in diameter and 4″ wide.
14. Slip cuff over stocking and stitch around top.
15. Trim and Fray Check seam as above.
16. Turn stocking RS out and lightly press seams.
Yarn Snowball Garland
YOU’LL NEED
3-5 different textures of white & off-white yarns
Styrofoam balls – 1″ & 2″
Pompoms – small and medium white
2-3 packages of med/large crystal or silver glitter beads in various sizes with bead hole opening large enough to thread needle through
Clear jewelry thread (non-stretchy)
Threading needle with eye large enough to thread clear thread
Scissors
Glue gun & glue sticks (hot temp)
Empty paper cardboard tube (one for each garland)
DIRECTIONS
1. Lay out materials to design pattern and length of garland. Tip: Make 4′ lengths to garland from tangling (20-30 yarn balls per 4′ length).
2. Begin by wrapping yarns around Styrofoam balls until balls are covered. Cut yarn and glue to ball.
3. When all yarn balls are made, layout repeat pattern of yarn balls, pompoms and beads.
4. Thread garland with yarn ball then alternate beads, pompoms and various styles of yarn balls. Continue until garland measures 4′ length. Tip: When adding pompoms thread through center of pompom to ensure it stays in place.
5. When garland is completed, store it by wrapping around an empty card board paper towel tube. Tape end to keep from tangling.
Floating Pom Poms Frames
YOU’LL NEED
Black frame of choice
Various 2″-3″ pom poms in white, silver, cream & gold
1/8″ ribbon in white, silver, cream & gold
White spray primer
White FolkArt Home Decor Chalk paint
Paintbrush
Sand paper
Glue gun & glue sticks
Surface cover
DIRECTIONS
1. Remove back, matting and glass from frame and discard.
2. Paint frame with white spray primer. Allow to dry.
3. Paint frame with home décor chalk paint. Allow to dry. Apply additional coats as necessary.
4. Sand edges of frame to expose original color and to give vintage appearance.
5. Choose how many pom poms will fit in frame.
6. For each pom pom, cut a length of correlating ribbon that is longer than the frame.
7. Apply dot of glue to center of pom pom and insert end of ribbon. Allow to dry. Repeat for all pom poms.
8. Apply dot of glue to the top back strip of frame where the ribbon is going to hang.
9. Place other end of ribbon in the glue so the pom pom end is towards the ceiling.
10. Bring ribbon up and over to the front of the frame.
11. Cut a 10″ piece of ribbon.
12. Make a 2″ bow and glue to top edge of ribbon.
13. Repeat for all pom poms.
Find this craft and more holiday fun at JOANN.COM