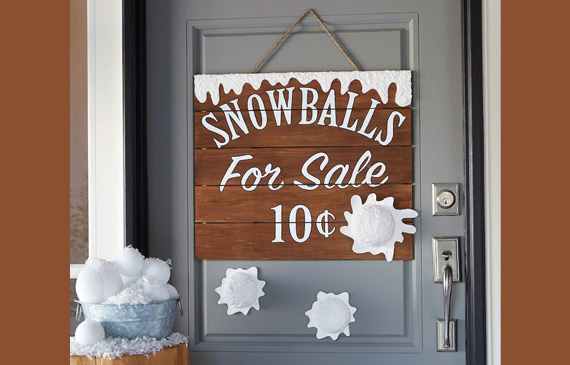

From MICHAELS
YOU’LL NEED
Natural Jute Rope By Ashland
DecoArt Snow Writer Paint
DecoArt Snow-Tex
FloraCraf SmoothFōM Half Ball White
Royal & Langnickel Soft-Grip Filbert Brush
Computer
Printer
Butter Knife (Palette Knife or Craft Stick)
Pencil
Craft Knife
Foam Brush
Paper Towels
Ruler
Tape
Scissors
Kitchen Knife
BASSWOOD SHEET 1/8 X 4 X 24″
BASSWOOD- 1/8 X 3 X 24″
Hot Glue Gun
Hot Glue Sticks
DIRECTIONS
1.Step 1 Stain the front and edges of all of the wood pieces. Brush on the stain with the foam brush and wipe off excess with a paper towel. Let dry.
2.Assemble the sign. Lay the two 3″ x 24″ wood pieces vertically on a working surface, about 13″ apart. Next, lay the 4″ x 24″ pieces horizontally across the vertical pieces. Space the boards about 1/8″ apart. Hot glue the horizontal boards across the vertical pieces. There should be approximately 3″ excess on each end of the vertical pieces. Once the glue has cooled and hardened, score the excess boards several times with a craft knife flush against the last horizontal board, and cut off.
3.Click here to print template one and here for template two. Once printed, the template will need to be pieced together because the overall size is larger than a standard paper size. Line up the words and tape the pages together.
4. Lay a sheet of graphite paper behind the pattern and trace over the letters with a pencil to transfer them onto the sign. Make sure the pattern is centered on the sign.
5.Remove the pattern and graphite paper. Paint the letters with Wedding Cake acrylic paint. Let dry.
6.Outline the letters with the black Sharpie marker.
7.Use the Snow Writer to draw the desired snow drip shape across the top of the sign. Use the image as a guide.
8.Fill in the snow drip shape with Snow-Tex texture medium. Apply to the sign with a butter knife (palette knife or craft stick). Apply it thick, like frosting. Let dry.
9.Coat the half Styrofoam ball with Snow-Tex texture medium. Let dry.
10.Trace the large “splat” pattern onto white cardstock. Cut out and coat with Snow-Tex. Let dry and then glue the half snowball to the center of the “splat”. Attach to the sign using hot glue.
11.Carefully cut a 3″ Styrofoam ball in half using a kitchen knife. Repeat Steps 9 and 10 to create additional smaller snowballs to attach to the door. Trace the smaller “splat” pattern for the smaller balls.
12.Cut jute about 24″ long and hot glue either end to the back of the sign to create the hanger.
Share your project photos with #MakeItWithMichaels
Find this craft and more holiday fun at michaels.com