From MICHAELS
Looking for some unplugged fun over the holidays? It doesn’t get more sparkly than our Santa’s Belt Slime, filled with glitter and shiny sequins! We’ll give you a list of mix-ins plus all the steps to decorate your slime jar in our instructions below.
YOU’LL NEED
1 Elmer’s Washable Clear School Glue, 5oz.
1 9″ X 12″ Adhesive Foam Sheet By Creatology – Color: Black
1 9″ X 12″ Glitter Foam Sheet By Creatology – Color: Gold
1 Wilton Icing Color – Color: Christmas Red
1 Plastic Storage Jar By Craft Smart, 8oz.
Pencil (or Pen)
Wax (or Palette) Paper
1 – Crayola Pointed Tip Scissors
1 – Holographic Round Cup Sequins By Creatology
1 – Creatology Peel & Stick Felt
DIRECTIONS
1. Project Notes: When you’re crafting with little ones, keep an eye on the mix-ins, since some of them may present a choking hazard.
When making slime, be smart and protect your work surface with wax (or palette) paper. You also may want to wear an apron (or other protective garment) to avoid slime-related accidents.
2. Follow your recipe’s instructions to make a batch of clear slime and mix in lots of Christmas Red icing color. You want this slime to be as red as Santa’s suit.
TIP: Dip a craft stick into the icing color container, then mix the color into the glue, stirring thoroughly until it’s completely blended. Always use a new, clean craft stick when dipping into your food coloring in order to avoid cross-contamination.
3. Flatten out your slime on a piece of wax (or palette) paper and sprinkle on plenty of red glitter. Sprinkle on some of the fine and jumbo glitters from the glitter stacker, too. Fold the slime’s edges in toward the center to blend the glitter into the slime.
4. Repeat this technique to add a generous sprinkle of red holographic sequins. Do the same to add red glitter sequins, too. Continue folding and stretching until all the mix-ins are evenly distributed throughout the slime. Set your slime aside for a bit while you decorate your jar.
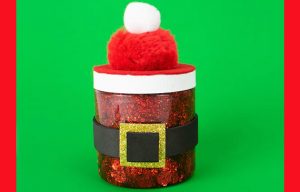
5. To make your jar, first cut a strip from the short end of your black adhesive foam sheet. It should be about ¾” wide. Use the strip to measure and cut the small foam square, so they are the same height; then, remove the foam’s paper backing from the strip and wrap the strip, horizontally, around the center of the jar to make Santa’s belt.
TIP: Use the edge of your Gold glitter foam sheet as a straight edge to draw a line for cutting.
6. Next, remove the paper backing from the small black foam square and place it near the corner of a piece of Gold glitter adhesive foam. Cut about 1″ square of Gold glitter foam with the black square in the center. Now, remove the backing from the Gold glitter foam and center it on top of the black belt on your jar, to make Santa’s buckle.
TIP: When you place the Gold glitter square on top of the black foam strip, press it against the black foam, but don’t press it against the jar itself, since this will cause the Gold square’s edges to bend down a bit too much.
7. To cover the top of the jar, first turn it over and trace its lid onto the paper backing on a piece of red adhesive felt. Cut out this foam circle, remove its backing and stick onto the lid, covering it completely.
8. Next, use the school glue gel to attach one 2″ red pom-pom in the center of the lid. Use school glue gel once more to fasten a 1″ white pom-pom on top of the red one. Let the glue dry for a bit.
9. When you are done playing with your slime, store it in your jar. You will see the red sparkly slime through the clear sides of the jar and now it looks just like Santa’s belt.
Share your project photos with #MakeItWithMichaels
Find this craft and more holiday fun at Michaels.com