From MICHAELS
This Pumpkin Slime is just as ooey and gooey as taking out the seeds inside a real pumpkin…only so much more fun! Add bright orange yarn to the mix to make it extra stringy!
PROJECT NOTES
– Be careful when children are crafting with small wood shapes and pom poms, as the products do have a choke hazard warning on the label.
– Protect your work surface with wax (or palette) paper and wear an apron (or other protective garment) to protect clothing, as the food coloring may stain.
-Dip a craft stick into the food coloring container, then mix the color into the glue, stirring thoroughly until it’s completely blended. Always use a new, clean craft stick when dipping into your food coloring in order to avoid cross-contamination
This slime has TWO SEPARATE SLIMES that you’ll make, then mix together.
RED GLITTER SLIME
BRIGHT ORANGE SLIME
*You’ll also need a large clear treat bag with tie and a black paint pen
After these two slimes are made, directions follow for Pumpkin Slime.
FOR ELMER’S RED GLITTER SLIME
*Adult supervision is required; This project is not appropriate for children under the age of 3 years. Always wash your hands before and after making and playing with slime. Warning: If large quantities of contact lens solution are accidentally ingested (greater than a tablespoon), get medical attention immediately.
YOU’LL NEED
6 fl oz ELMER’S Red Glitter Glue
1/2 tablespoon of baking soda
1 1/4 tablespoon of contact lens solution
DIRECTIONS
1.Find a bowl, cup, or plate to mix your slime in.
2.Pour out the entire contents of a 6 oz of Elmer’s Glitter Glue into the bowl.
3.Add 1/2 tablespoon baking soda and mix.
4.Add 1 1/4 tablespoon contact lens solution.
5.Mix until slime forms and it begins to get harder to mix.
6. Take the slime out and begin kneading with both of your hands If needed, add 1/4 tablespoon contact lens solution to make the slime less sticky.
FOR ELMER’S BRIGHT ORANGE COLORED SLIME
Note: Adult supervision is required; This project is not appropriate for children under the age of 3 years Warning: If large quantities of contact solution are accidentally ingested (greater than a tablespoon), get medical attention immediately.
YOU’LL NEED
4 fl oz ELMER’S White school glue
1/2 tablespoon baking soda
1 tablespoon contact lens solution
WILTON Copper and Golden Yellow food coloring (add 1 drop at a time to achieve bright orange color)
DIRECTIONS
1.Find a bowl, cup, or plate to mix your slime in.
2.Pour out the entire contents of a 4oz of Elmer’s school glue into the bowl.
3.Add 1/2 tablespoon baking soda and mix.
4.After mixing, add food coloring.
5. Mix and/or add more food coloring until you get the color you want.
6. Add 1 tablespoon contact lens solution.
7.Mix until slime forms and it begins to get harder to mix.
8.Take the slime out and begin kneading with both of your hands. If needed, add 1/4 tablespoon contact lens solution to make the slime less sticky.
ONCE BOTH SLIMES ARE MADE
1.Form each slime into a long strip and place one on top of the other on your non-stick surface. Now, fold and twist the slimes together until they are mostly blended.
2.Flatten out your slime on a piece of wax (or palette) paper and sprinkle on white pop pom sea date wood shapes (that look like small pumpkin seeds). Fold the slime’s edges in toward the center to blend the mix-ins into the slime. Continue until they are evenly distributed throughout the slime.
3.To make your slime extra stringy, cut two or three 4” to 6” pieces of bright orange yarn, and fold those into the slime, as well.
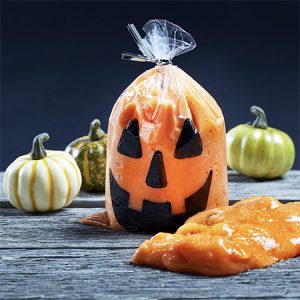
4.Use a black paint pen to add a jack o’lantern face to your treat bag. Store your slime in the treat bag to play with later, or give it away to a trick-or-treating friend.
NOTE: If you intend to keep your slime for more than a few hours, be sure to store it in an airtight, sealable container (or resealable plastic bag).
Find this craft, suggested brands for supply list, and more holiday fun at michaels.com