From JOANN
Picnic Themed Treats
YOU’LL NEED
Favorite sugar cookie cutout recipe
Wilton meringue powder & royal icing recipe
Vanilla cake mix
Brownie mix
Wilton gel food colors
Edible food marker – black
Fondant – yellow & green
Food spray – red
Rolling pin
Wilton whoopie pie mold baking sheet
13″x 9″ baking pan
Cookie sheets
Circle & square cookie cutters
Silicone baking mats or parchment paper
Icing decorating bottles, bags, or parchment cones
Scribe tool or toothpick
Checkerboard stencil
Optional – icing decorating tips #2, #3, and #4
Optional – buttercream icing
DIRECTIONS
1.Mix your favorite sugar cookie cutout recipe.
2.Divide dough into chunks and roll out until dough is 1/4″ thick. Make sure to flour your rolling surface lightly.
3.Use a circle cookie cutter to cut out dough and place onto silicone mat or parchment paper lined cookie sheets. Try placing rolled out dough onto cookie sheets and freeze for 5 minutes before cutting out shapes. This will help to prevent dough from becoming misshapen when moving cut out circles.
4.Follow baking instructions according to your favorite recipe and cool completely before decorating.
5.Use the recipe on Wilton’s meringue powder to mix royal icing.
6.Scoop out some icing and thin with water to get your piping and flood consistencies. Place these into either bags or bottles. If using decorating tips, #2 is best for piping and #3 or #4 is best for flooding.
7.Decide how many cookies you would like to be the ants on the tablecloth, and outline and flood these circles with white icing, leaving a small rim around the edge for a decorative border if desired. If needed, use a scribe tool or toothpick to spread icing and pop air bubbles.
8.Moving on to the grill cookie base, you will need black piping and flood consistencies and gray piping consistency. Pipe and flood with the black icing whichever circles you would like to be grills. While the icing is still wet, use the gray icing to pipe a circle and lines to create a grate within the black circle.
9.For the remaining circles, you will need light and dark green medium consistency, and a salmon pink color of flood consistency. Start with the dark green to pipe along the edge, then inside right next to that, pipe the light green. Use a scribe tool or toothpick to gently swirl them together to create the peel texture of a watermelon. Then flood the rest of the cookie with the salmon pink color.
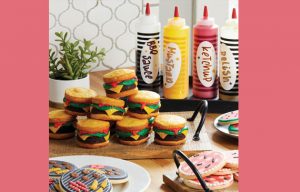
10.As the base layer of the cookies is drying, move on to the burger whoopie pies. Mix the vanilla cake mix according to the box or recipe. Lightly spray the whoopie pie baking pan, and fill each circle about half full. Bake 9-10 minutes. Cool for a couple minutes in the pan, then remove and place on cooling racks. Repeat as many times as needed to produce the quantity desired (you will need 2 whoopie pies per burger).
11.For the patty of the burger, mix the brownie mix according to the box or recipe. Line a 9″x 13″ pan with parchment paper and pour in the batter. Bake according to the recipe and cool completely in the pan. One 9″x 13″ pan of brownies will yield enough patties for 12 burgers.
12.While the whoopie pie buns and brownie patties are cooling, use yellow and green fondant to make the cheese and lettuce. Roll each color fondant to about 1/16″ thick. Use a square cookie cutter for the cheese and a circle cookie cutter that is a little larger than the whoopie pie for the lettuce.
13.Prepare either red buttercream or royal icing to act as ketchup, and place in a decorating bag or bottle. This will also hold your burger together.
14.Once the pan of brownies is cooled, lift them out with the parchment paper. Use a circle cookie cutter about the size of the whoopie pie to cut out the burgers from the pan of brownies.
15.Now it is time to assemble the burgers. Start with the bottom bun, add a small amount of the red icing then place the patty on the bottom bun. Add the cheese and lettuce, use the red icing again if needed. On top of the lettuce, add a ring of the red icing along the edge and add the top bun. Add more of the red icing as desired to mimic ketchup oozing from the burger.
16.When the cookie bases are dry, the details can be added. Start with the white base cookies. Make sure your work surface is covered for this next step. Place the checkerboard stencil on top of one white cookie. Follow the directions on the can of red food spray, to spray the stripes on the stencil. Lift stencil and rotate 90 degrees and repeat to create the tablecloth pattern. Do this for all the white base cookies and set aside to dry.
17.Determine which foods you would like on your grill and tint piping consistency icing to the colors needed. For example, brown for burgers, salmon pink for hot dogs, and yellow for corn on the cob. Place these into decorating bags and pipe the food. For corn on the cob, a bunch of dots works best. Once the food is dry, use an edible black food marker to add grill marks.
18.Black piping icing is needed for the watermelon and ant cookies. Use this to pipe the seeds on the watermelon, and the body of the ants. 3 ovals, like a snowman, works well for the ant bodies.
19.When the ant bodies are dry, use an edible food marker to add antennas, legs, and walking dashes. Last, use white piping consistency to add a border around the tablecloth.
20.Let cookies dry completely before packaging them into airtight containers.
TIPS
Place a damp paper towel over tips of bags and bottles if returning to decorating within a couple hours. If a longer break between decorating steps is needed, place icing in airtight containers.
Find this recipe and more holiday treats at joann.com