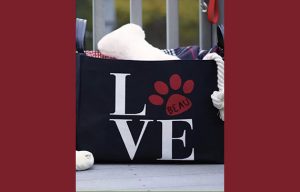

From JOANN
*Finished size: 21″wide x 10″ deep x 13″ tall
Your favorite furry friend needs their own toy bin to keep their most precious toys and belonging and this project is the perfect solution.
YOU’LL NEED
SQUARE BY DESIGN Square (available at JOANN)
1 yd 54″ width Fabric A for back and sides (duck cloth recommended)
2 yds 54″ width Fabric B for lining and bottom insert
1/8 yd faux leather for handles
3 yds PELLON PELTEX Ultra Firm fusible interfacing
9 3/4″ x 20 1/4″ – 1/4″ plywood or hardboard
Chalk for marking
Basic sewing supplies
Denim machine needle
Rotary cutter, cutting mat and ruler
Pearl cotton embroidery thread and large eye embroidery needle (optional)
DIRECTIONS
NOTES:
Seam allowances are 1/2″.
If ironing is needed, use dry iron.
Use a denim machine needle.
1.Measure and mark motif center. Trim Square By Design® Square to measure 22″ wide.
2.Trim lower edge of Square, leaving 6″ of fabric below lower edge of motif. Trim top edge of Square to leave a height of 20″. After trimming, Square should measure 22″ wide by 20″ high. Motif will NOT be centered top to bottom.
3.Machine stitch with a small zigzag stitch close to fabric edges to prevent raveling. Press.
4.Optional embroidery: Use an embroidery stitch of choice and pearl cotton to embroider pet’s name or initials on the paw. Set aside
5.From Fabric A, cut 4 – 5″ wide x 20″ high toy bin end pieces. From ultra firm fusible interfacing, cut 4 – 5″ x 19″ pieces. Fuse to each end piece, leaving 1″ at the top of each fabric piece free from interfacing. Set aside.
6.From Fabric A, cut 1 piece to measure fabric 22″ wide x 20″ high for bin back. Cut 1 ultra firm fusible interfacing 22″ x 19″. Fuse interfacing to fabric, leaving 1″ at top of fabric free from interfacing. Set aside.
7.From Fabric B, cut 2 – 30″ wide x 20″ high pieces. Place lining pieces right sides together, aligning edges. Pin sides and bottom edge. Stitch. Leave wrong side facing out. Press and lay on a flat surface. Measure and mark a 4 1/2″ square on the lower left and right corners. Cut out squares. To box corners, open out lining and align left side seam to bottom seam. Match fabric edges. Stitch. Repeat with right side. Set aside.
8.With Square fabric facing right side up, pin a 5″ x 20″ Fabric A strip to the left edge of the motif fabric, aligning edges and keeping the end without interfacing at the top of the Square fabric. Stitch. Repeat on the right side. Press.
9.Pin an end fabric strip to the left edge of the toy bin back fabric, with the end not interfaced at the top. Stitch. Repeat on the right side. Press.
10.Place toy bin front and back pieces with right sides together. Match edges, pin and stitch sides and bottom. Press.
11.Lay toy bin on a flat surface. Measure and mark a 4 1/2″ square on the lower left and right corners. To box corners, repeat Step 7.
12.Turn under 1″ around the top edge of the toy bin. Press well to form a crisp edge and then unfold. Turn right side out.
13.From faux leather, cut 2 – 4″ x 13″ pieces. For one handle, fold long edges inward with wrong sides together, overlapping edges to form a strap 1 1/4″ wide. Topstitch long edges. Repeat to form second handle.
16.Place left handle on toy bin, right sides together, with outer edges of handle aligned with toy bin side seams and raw edges even with toy bin fabric edge. Stitch. Repeat with second handle.
17.Turn lining wrong side out. Press down 1″ to wrong side of fabric around top edge and press.
18.Fold down 1″ along top edge of toy bin and press. Insert lining into toy bin, wrong sides together and aligning side seams and top folded edges. Pin. Stitch around toy bin close to top edge.
19.From Fabric B, cut 1 – 21″x 22″ piece for bottom insert. Fold in half, right sides together to form a rectangle 10 1/2″ x 22″. Align edges and pin. Stitch the long edge and one short edge. Trim seams and turn right side out. Turn open end in 1/2″ and press. Insert plywood or hardboard in opening. Hand stitch opening closed. Position inside bottom of toy bin.
Find this craft and more holiday fun at joann.com