From MICHAELS
Make some bone-chilling fun when you make a Model Magic Halloween Mummy…it’ll be a frighteningly good time!
YOU’LL NEED
CRAYOLA Black Model Magic, 4oz
CRAYOLA White Model Magic, 4oz
CRAYOLA Neon Green Model Magic, 4oz
CRAYOLA Classic Broad Line Markers
DIRECTIONS
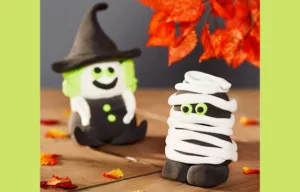
1.First, pinch off about a fourth of the black Model Magic and roll it into a ball for the mummy’s body. Then pinch off a little more black Model Magic and roll it into another, slightly smaller, ball for the mummy’s head.
2.Next, take more black Model Magic and roll two short, thick tube shapes that will become the mummy’s legs and feet. The tubes should be long enough so you can see them from the front and the back once they’re in place. This will help keep this little guy from falling over.
3.Now it’s time to put all the mummy pieces together! Place the head on top of the body and the body on top of the tube shapes.
4.Roll out a long, snake-like strip of white Model Magic. Place a marker on its side (such as a rolling pin), then roll it down the snake-like length of Model Magic to slightly flatten the entire strip. This will become the wrap for your mummy.
5.Use the long strip of white Model Magic to wrap your mummy’s body. Be sure to leave some gaps between rounds (just like a real mummy). Leave a larger gap at the top, on the head, where you can add eyes.
TIP: You can make shorter strips and layer the wraps to make handling it a little easier.
6.Now, roll two tiny Neon Green Model Magic balls and two teeny-tiny black Model Magic balls. Smash the teeny-tiny balls into the front, center of the tiny Neon Green balls to make his eyes. Place each eye on the front of the head, inside the larger gap.
7.That’s all there is to it! Now, just leave your mummy in a safe place to air dry. This will take about a day or two, and then you’re ready to haunt the neighborhood with your new, spooky friend!
Share your project photos with #MakeItWithMichaels