From MICHAELS
We’ve heard you need eggs to make ice cream, but now you can make an Ice Cream Cone Egg…even the Easter Bunny won’t believe how simple this craft is to make.
YOU’LL NEED
Paper plate
water
bowl
Creatology Small Decorative Easter Eggs
Craft Smart All Purpose Brush Set
Craft Smart Multi-Surface Premium Satin Acrylic Paint, Native Turquoise
Craft Smart Multi-Surface Premium Satin Acrylic Paint, Fawn
Craft Smart Multi-Surface Fine Tip Premium Paint Pen, Gold
Craft Smart Multi-Surface Premium Satin Acrylic Paint, White
Craft Smart Multi-Surface Premium Satin Acrylic Paint, Rosemarie
Craft Smart Multi-Surface Premium Satin Acrylic Paint, Dandelion
Hot glue gun and glue *ADULT ONLY
Red pom pom
DIRECTIONS
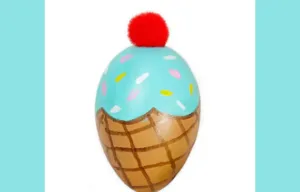
1.The wider end becomes the ice cream top, and the narrower end becomes the cone-shaped bottom. To start, paint the wider end of the egg with Native Turquoise paint. As you paint, make the edges scalloped, just like in our photo. Let the egg dry for a bit.
TIP: You might need to touch up a few places after your first coat, so check carefully. Add a little more paint if it’s necessary.
2.Paint the narrower end of the egg with Fawn, right up to the edge of the Native Turquoise. Let the egg dry again.
3.ADULT: Use the Gold paint pen to draw a diagonal grid onto the Fawn-colored section of the egg to make it look like an ice cream cone. Let the Gold paint dry.
4.Let’s add some sprinkles! With a small paintbrush, make little lines on the Native Turquoise top of the egg, using the White, Rosemarie and Dandelion paints (just like in our photo). Let the egg dry once more.
5.ADULT: Add a cherry to the top of this ice cream cone. With a hot glue gun, glue the red pom-pom onto the turquoise end of the egg. Give the hot glue just a minute to set before you hand it over!
Find this craft and more holiday fun at michaels.com