
From MICHAELS
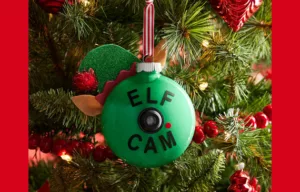
Keep an eye on all of Santa’s helpers when you create this Elf Cam Ornament for your tree.
YOU’LL NEED
Cricut Design Pattern (CLICK HERE TO PRINT)
Santa Cam Decorative Ornament Lens by Make Market
Creatology Wood Craft Sticks
Recollections Fine Glitter Paper, Green
Mini Glue Sticks and glue gun *ADULT REQUIRED
Creatology Basic Felt, 9” x 12”, Cashmere Tan
Creatology Foam Sheet, 12” x 18”, Red
Creatology 3/4” Sparkle Poms Poms, Red
Creatology Extra Fine Glitter Tube, Kelly Green
Recollections Smooth Solid Cardstock Paper, 12” x 12”, Lipstick
FolkArt Drizzle Pre-Mixed Fluid Pouring Acrylic Paint, Go Green
Standard Grip Transfer Tap by Make Market
Solid Permanent Vinyl by Make Market, Matte Cherry Red
Solid Permanent Vinyl by Make Market, Matte Black
100mm Plastic Clear Disc Ornament by Make Market
DIRECTIONS
1.Pour a generous amount of paint into your disposable cup. Add glitter and stir well with a craft stick.
2.Remove the cap from the top of your ornament and set aside.
3.Pour the glittery paint into your ornament and swirl the paint around until the inside of the ornament is completely covered.
4.Set the ornament in the cup, upside-down, so the excess paint is drained. Leave on the cup and let dry.
5.Now, CLICK HERE for the design link in Cricut Design Space.
6.Click ‘Make It ’in the upper right corner and then click ‘Continue ’in the lower right corner of your screen.
7.Place the first layer of vinyl, grid-side down, onto your cutting mat and load it into your Cricut machine. Select ‘Vinyl ’as your material and follow the prompts to cut out your design; then gently peel the vinyl away from your mat. Repeat for your remaining vinyl layers.
8.Use scissors to cut away the vinyl around your design. Use your weeder tool to peel away the excess material around and within your design. When you’re done, only the design itself should be left on the backer paper. TIP: Save remaining vinyl for a future project.
9.Cut the elf pieces from scrap cardstock; then trace onto cardstock and felt. Cut out shapes.
10.Use hot glue to assemble your elf and set aside.
11.Cut a piece of transfer tape that’s just a bit larger than the design. Peel away the tape’s backer paper and place the tape, sticky-side down, over this part of the design. Use the scrapper tool to burnish the vinyl so it’s completely stuck to the tape.
12.Gently peel the white backer paper from the cut-out design, which now should be stuck to the transfer tape.
13.Hold the transfer tape with the design over your surface to determine where you’d like it placed; then press it onto your surface. Again, use the scrapper tool to burnish the vinyl to make sure it’s completely stuck to the surface and gently peel away the transfer tape, leaving the vinyl transferred to your surface. TIP: Be sure to leave enough space in the middle of ‘Elf’ and ‘Cam’ to attach the lens.
14.Add the red dot for the “record” indicator.
15.Return cap to the top of the ornament.
16.Hot glue your elf to the back of your ornament so it appears he is looking through the lens from the back and recording for Santa.
17.Cut a piece of ribbon, thread it through the loop at the top of your ornament and tie a knot. Trim ends at an angle to prevent fraying.
Find this craft and more holiday fun at michaels.com