
From JOANN
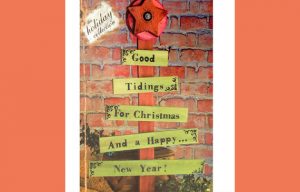
Create a festive wooden Christmas tree!
SUPPLIES & TOOLS
Rit Liquid Dye – Cherry Red, Apple Green, Cocoa Brown
3″ wide x 9 ft. pine or basswood board
Walnut Hollow wood shapes – star, circle
Stencils – embellishments, letters
Beacon adhesives Gem-Tac
Glue
Drill & drill bit
Hammer & nails
Jeweled embellishment
Lint-free (tack) cloth
Disposable spoon
Black permanent marker
Pencil
Ruler
Sanding block
3 small dye containers
Water
Table saw (optional)
Wax paper
Clear polyurethane (optional)
Latex gloves
Measuring cup
Measuring spoons
Paintbrush
Paper towels
Plastic table cover
DIRECTIONS
1. Using table saw, cut wood to the following lengths: 8″, 11″, 14″, 17″, 20″ and 32″.
2. Sand all pieces thoroughly, paying special attention to the edges. Wipe with lint-free cloth or tack cloth.
3. Shake all dye bottles. Wearing latex gloves, prepare dye baths as follows in three different containers. Use hot water heated to 140 degrees. For Apple Green, mix 1/2 cup hot water with 3 tablespoons dye. For Cherry Red, mix 1/2 cup hot water with 2 tablespoons dye. For Cocoa Brown, mix 1/2 cup water with 2 tablespoons dye.
4. Lay the 32″ piece of wood and wood star on wax paper. Use paintbrush to dye-stain the wood with Cocoa Brown on front, back and sides. Stain one side at a time and allow to dry completely on wax paper.
5. Dye-stain circle with Cherry Red.
6. Dye-stain 20″ length of wood Apple Green. Add 1/4 cup hot water to container and dye-stain 17″ length of wood with diluted dye solution. Keep adding 1/4 cup of water to mixture as while dye-staining the 14″, 11″ and 8″ lengths of wood to create an ombre effect. Allow wood pieces to dry completely.
7. Use permanent marker and letter stencil to stencil sentiments to add words and phrases to the tree. Use embellishment stencil for decorations on star and edges of wood slats.
8. Use glue to adhere star to red circle and to adhere wood slats to form tree shape. Allow to dry.
9. Drill holes in slats and wood circle and hammer in nails to secure.
10. Use Gem-Tac to adhere sparkly embellishment to center of star. Allow to dry.
11. If desired, apply clear polyurethane to wood tree. This will help protect the wood if hanging tree outdoors.
Find this craft and more holiday fun at JOANN.COM