
From MICHAELS
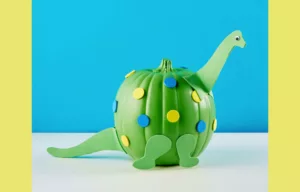
Upgrade your Halloween from classic to Jurassic with this exceptionally cute Dinosaur Pumpkin!
YOU’LL NEED
6” x 9” Adhesive Foam Sheets by Creatology, green (and other favorite colors)
Easy-Grip Paint Brushes by Creatology
Craft Smart Multi-Surface Premium Satin Paint, Crisp Green
Elmer’s Glue-All Multi-Purpose Liquid Glue
Creatology Assorted Wiggle Eyes
DIRECTIONS
1.On the green foam, draw a dinosaur neck and head, foot, and tail. Cut out the foam shapes.
Place each shape back onto another piece of green foam, trace each shape, and cut out.
2.Next, paint the entire pumpkin with Crisp Green paint (or any color you like!) and let the paint dry. Continue adding coats of paint until you can’t see the orange of the pumpkin anymore.
TIP: It’ll take several coats of paint to get complete coverage. Always be sure to let you paint dry
between coats.
3.Peel off the paper backing from the two head/neck pieces and, starting at the tops of the heads, stick them together until you reach the bottom 1 1/2”. Don’t press the bottom sections together; instead, stick them flat against the top of the pumpkin, on one side of the stem, just
where it starts to curve down.
4.Peel off the backing from the two tail pieces and, starting at the tail’s tip, press them together. Again, leave the top 1 1/2” open and use section to attach the tail to the pumpkin’s bottom on the side opposite the head.
5.Now, peel the adhesive backing from the top part of the dinosaur feet and attach each one to the pumpkin’s bottom (as shown in photo).
6.Cut out more foam sticker shapes in green or different colors to decorate your pumpkin
To finish, just glue wiggle eyes in place on your dinosaur’s head, and let the glue dry. Share your project photos with #MakeItWithMichaels
Find this craft and more holiday fun at michaels.com