From MICHAELS
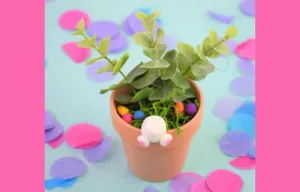
Create this adorable bunny pot with Sculpey clay, great for Spring or Easter!
YOU’LL NEED
Disposable cover (wax paper/foil)
Metal baking sheet
Sculpey Clay Tool Starter Set
Sculpey III Oven-Bake Clay, Turquoise
Sculpey III Oven-Bake Clay, Granny Smith
Sculpey III Oven-Bake Clay, Yellow
Sculpey III Oven-Bake Clay, Just Orange
Sculpey III Oven-Bake Clay, Pink Glitter
Sculpey Bake & Bond
Original Sculpey Oven-Bake Clay
Ashland Clay Pot
E6000 Permanent Craft Adhesive
Craft forest moss
DIRECTIONS
1.Protect your work surface with a disposable cover, such as wax paper (or disposable foil). TIP: Work on a metal baking sheet (wax paper or foil). Uncured clay may damage unprotected furniture or finished surfaces. Be sure to cover your crafting area appropriately.
2.Start with clean hands, unwrap, and knead clay until soft and smooth, or condition by running clay through a conditioning machine. TIP: You can also condition by running clay through a pasta machine. Use a designated machine for clay purposes only. Clean hands with soap and water (or baby wipes) before switching clays. Shape clay, pressing pieces firmly together. Wash hands after use.
3.Roll out some white clay into one large ball about 3/4″ to use it as the body.
4.Then, roll out two medium-sized egg shape pieces of clay and flatten slightly for the feet.
5.Next roll out a small-sized ball of white clay to use as the cotton tail. TIP: You can adjust the sizes according to your desired bunny.
6.Using the needle tool, make an indent on the bottom side of the largest white ball of clay (the body).
7.Using the needle tool again, make two indents on the bottom side of both bunny feet.
8.Place the body on the rim of the pot to make sure it fits comfortably. Take it off and adjust if needed for a snug fit.
9.Roll six tiny balls of pink glitter clay and two bigger-sized balls for the feet.
10.Place one of the bigger-sized balls on the middle of the paw for each foot. Then, place three of the six small balls on the edges where you placed the indents to better represent the bunny’s paws.
11.Place each foot on the body in the bottom area of the bunny. TIP: It is best to place these with small amounts of Oven Bake Clay Adhesive to secure them to the body.
12.You may adjust the positions to your liking and place the bunny back on the rim to check the position.
13.Add the small white tail to the body right above the feet, attach with Oven Bake Clay Adhesive.
14.Roll six small balls of various shades of clay and roll them into egg shapes.
15.Preheat your oven to 275 degrees and bake the clay pieces for 15 minutes per 1/4” thickness according to package directions. Allow to cool completely before handling.
TIP: For best results:
• Bake clay on an oven-proof surface such as metal or aluminum foil. Oven safe glass or ceramic surfaces are also acceptable for baking; however please note that the baking times may take longer as the glass or ceramic surfaces take longer to heat up.
• Use an oven thermometer.
• Do not use a microwave oven.
• Do not exceed the above temperature or recommended baking time.
16.Assemble all the pieces in your pot after baking. Fill the bottom belly indent with super glue and place it on the rim. Finally, stuff the loose greenery/grass to fill the pot.
Find this craft and more holiday fun at michaels.com