From MICHAELS
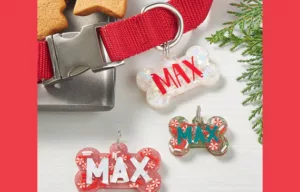
Make a festive Christmas Resin Pet Tag for your favorite furry friend.
YOU’LL NEED
Craft Smart Pet Tag Silicone Mold Set
Craft Resin
Recollections Specialty Polyester Glitter White Iridescent Snowflakes
Creatology Jumbo Craft Sticks
Oracal Orate MT80P Transfer Tape
12mm Split Rings by Bead Landing
Oracal 651 Intermediate Cal Vinyl
Craft Smart Casting Resin and Casting Hardner
Cutting Machine for vinyl
DIRECTIONS
1.Follow instructions on packaging to mix resin. You will need enough to fill most of the mold. TIP: Make sure mold is clean, dry and free of dust.
2.Add snowflake specialty glitter and mix well so it is evenly distributed throughout your resin. TIP: There are so many options of glitters and fillers! If you do not like snowflakes, try peppermints, Santa faces, trees, etc.!
3.Pour resin into mold. Use a toothpick to help move the resin so it completely covers the mold’s cavity and to pop any bubbles. Set aside to cure overnight.
4.Design your pet’s name in your cutting machine’s software and cut from vinyl. Weed excess material from around and within your pet’s name with your toothpick (or weeding tool).
5.Use transfer tape to add vinyl design to cured resin in mold. Burnish with a craft stick (or your fingernail) to make sure all edges of the vinyl are bonded to resin before lifting the transfer tape away from your design.
6.Mix enough resin for a thin, top layer of clear resin and pour into your mold as you did in Steps 1 and 3. Set aside to cure overnight. TIP: If desired, add a few snowflake specialty glitter pieces for a dimensional look.
7.Carefully remove your shape from the mold.
8.Thread a split ring onto the top loop of your resin pet tag, then thread onto your pet’s collar.
Find this craft and more holiday fun at michaels.com