
From MICHAELS
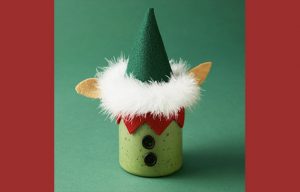
Let the kids get creative and silly with this Christmas Elf Slime…just in time for the holidays!
NOTE: This project is intended for kids age 6+. All types of ELMER’S glue work with this recipe; however, one 7.625 fl. oz. [225.5 mL] bottle of white glue was used to make the Christmas Elf Slime, as shown. Protect your work surface with wax (or palette) paper and wear an apron (or other protective garment) to protect clothing from staining.
YOU’LL NEED
Wood Button Mix by CREATOLOGY
Multi-Suface Premium Satin Acrylic Paint by CRAFT SMART, 2oz., Black
Computer
Printer
Big Kid’s Scissors by CREATOLOGY
Pen
1 Piece 12” x 18” of Premium Felt by CREATOLOGY, Pirate Green
1 Piece 9” x 12” Basic Felt by CREATOLOGY, Cashmere Tan
1 Piece 9” x 12” Basic Felt by CREATOLOGY, Red
Craft Glue by CREATOLOGY
Low Temp Mini Glue Gun by CRAFT SMART *Adult
Mini Glue Sticks by ARTMINDS
Plastic Storage Jar by ARTMINDS, 8oz.
Fuzzy Craft Stem by CREATOLOGY, White
Favorite ELMER’S SLIME (CLICK HERE FOR RECIPES)
WILTON Icing Color, Juniper Green
Wax (or Pallette Paper)
Jumbo Wood Craft Sticks by CREATOLOGY
MIX-INS (try these or pick other favorite mix-ins)
Small Glitter Tube by CREATOLOGY, Red
Glitter Tube by CREATOLOGY, Kelly Green
Glitter by CREATOLOGY, 4oz, Kelly Green
Glitter by CREATOLOGY, Red
ALSO NEEDED
Foam Brush by ARTMINDS, 1in.
Paper Plate (or Pallette Paper)
Mixing Bowl
Measuring Spoon
ELMER’S Washable School Glue
DIRECTIONS
1.First, paint two small buttons with black multi-surface paint. Set aside to dry.
2.Next, CLICK HERE to download and print the template; then cut out the shapes.
3.Trace the hat on premium Pirate felt, the ears on Cashmere Tan felt and the zigzag collar on red felt. Cut out the shapes.
4.Brush a generous amount of craft glue around the rim of the jar lid. Attach the zigzag collar, as shown.
5.ADULT: Run a line of hot glue down the tab on the side of the hat and attach to other side to form the cone shape.
6.ADULT: Run a thick line of hot glue around the top edge of the jar lid, then attach the cone hat and the furry craft stem.
TIP: After you attach the hat, you may need to add more glue around the base of the hat to attach the furry stem.
7.Attach the elf ears to each side of your jar with craft glue. Hold in place for several minutes until glue sets.
TIP: ADULT: Hot glue the ears in place instead of the craft glue for a quicker set.
8.Attach the painted buttons to the front of your jar with a dab of craft glue. Set jar aside to let glue dry.
9.To make your Christmas Elf Slime, CLICK HERE to choose and make from ELMER’S great recipes.
10.Tint your clear slime Juniper Green. Mix well so the green is even throughout your slime.
11.Flatten out your slime on a piece of wax (or palette paper) and add your desired mix-ins, such as glitter (or sequin, pom-poms, or even jingle bells!). Fold the slime’s edges in toward the center to blend them into the slime. Continue until all of the mix-ins are evenly distributed throughout the slime.
TIP: To preserve your slime, store your cute Christmas Elf Slime until you are ready to play with it again!
Find this craft and more holiday fun at michaels.com