From MICHAELS
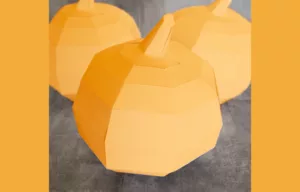
Get your puzzle on with this 3D Paper Pumpkin Sculpture project for fall.
YOU’LL NEED
3D Paper Pumpkin Template (CLICK HERE)
Computer
Printer
Cardstock Paper Value Pack by Recollections, White
Orange Cardstock
Loops & Threads Straight Scissors *Adult supervision required
Elmer’s Craft Bond Extra Strength Glue Sticks
Fiskars Traditional Bone Folder
Westcott Stainless Steel Ruler
DIRECTIONS
1.CLICK HERE to download and print six pumpkin templates and one instructions sheet on cardstock.
2.To cut out your island pieces, cut along solid lines.
3.Score along dot-dashed and dotted lines using a ruler and a bone folder.
TIP: If you do not have a bone folder, you can also use a thick sewing needle, a paper clip, a non-working pen or the back of a butter knife.
4.Fold towards you along dot-dashed lines. Fold away from you along dotted lines. Fold the dot- dashed and dotted lines following the guide shown in Figure 1.
5.Connect tabs to corresponding islands (Figure 2). Glue on back side of printed tab. Work on numbered tabs first and blank tabs will be evident as to which edge and island they connect to. Pumpkin builds from top to bottom. Start at Island #1.
Find this craft and more holiday fun at michaels.com